Showing posts with label home. Show all posts

Friday, April 13, 2012

Organize Me: Filing System

One of my biggest pet peeves, is the amount of paper we get in the mail and things that constantly need to be filed away for keeping.  Despite 95% of our bills being paperless now, there are still papers that need to be kept.  Having a filing cabinet was just not working for me, and I'm on a mission to do away with it completely.  (It's cheap and falling apart anyway.  It won't be missed.)

First, let's start with the inspiration from Jenna Sue

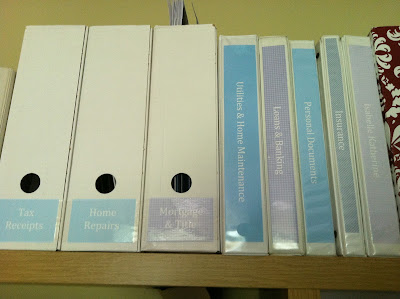
Here's my version. One obvious difference from the picture above is Jenna Sue is obviously better at taking pictures that I am.

But I do like my binder labels.


And I was pretty excited that I was able to find enough white binders and white magazine files around our house, so the cost for this organizing project was $0!!


I played around with the backgrounds a little.


Because I was emptying files, I cut the file folders in half, punched holes and used them as dividers.  All the papers that I deemed necessary to keep got put into plastic sheets.


Keeps all those important documents clean and organized by person.


The Home Maintenance Binder has very little in some of the categories because all of our bills are paperless, but it keeps those service records for our HVAC (and other household things) organized and easy to find.


I still have a ways to go before the filing cabinet is completely empty, but this makes me feel so much better about having to file all that stuff.


Now I just need an organized way to eliminate the pile of stuff "to be filed" that collects on the desk.

Wednesday, April 11, 2012

Organize Me: Linen Closet

I recently spent 45 minutes one morning this week, with coffee in bed (I love being home for Spring Break!), watching HGTV's Clean Freak online.  While I surely will never be quite as obsessively organized as those people are, it inspired me to make my home a little more organized in certain areas.

Our linen closet is a decent size and holds what we need it to.  But, despite my constant reorganizing, things don't always make it to the right spot.  The main idea I took away from those Clean Freaks was labeling everything.  Hello?! That's easy!  And hopefully will help others (like the husband who is GREAT at doing laundry and putting things away) put things back in the correct place.

First I tackled the shelves with all of our spare toiletries.  Things were already in random boxes I collected around the house, but I took a couple minutes and reorganized everything, decided on categories and printed up some labels.  And done! (Please excuse the blurry iPhone pictures.)


Then came the shelves with all the towels, sheets, table cloths, etc.  We have those wire shelves (which I'd love to eventually replace with wider wood shelves) and wanted the labels to be under the piles.  Enter a leftover cereal box and my new scallop rotary blade (Thanks Mom!)

Again, I decided on my categories and printed up some labels.  
Note: it's a good idea to make sure everything is spelled correctly so your husband doesn't have more examples about terrible you are at spelling. Sigh.

I put that scallop cutter to work...

Stuck on the labels...

  Admired my handiwork (with corrected spelling)

Figured out a way to attach the labels to the shelves (cut more labels in half and stick them to the back like below)

Once again admired my handiwork...

And now a nicely organized linen closet!


I love the idea of storing sheet sets inside one of the pillow cases to keep everything thing together (like only Martha Stewart can come up with), and I finally did it.


It's still not my ideal linen closet, which would probably look more like this from Better Homes and Gardens...


But it makes me feel more organized!


I love how simply printing labels can make me so happy!


Saturday, March 31, 2012

Board and Batten Entry Way

Since we moved in, the space behind our front door has been a problem area.  We are a no-shoes house, so there is a constant pile of shoes behind the door.  We threw down some ugly door mats that the previous owner left behind and this is what we have...

A big mess....constantly.  And yes most, of those shoes are mine.  We stuck the table there to see if it and it's matching partner would make a good bench after some revamping.

The other side of the door isn't much better.  This is a typical day.  Purse and computer bag get dropped by the front door, shoes get kicked off on the other side....

Gym bag gets tossed on the table.... Just terrible.  Not exactly the welcome I want for our home.

When a friend made-over their laundry area with board and batten, I went Pinterest-ing to find some more entry-way specific inspiration.

I loved this from Thrifty Decor Chick

And this one also from Thrifty Decor Chick

I read a lot of blog posts and Ana White had some helpful tips.

So we got to work.  First I drew a crazy sketch to start planning how much wood we would need.

We decided on using primed MDF.  It was a little thiner than primed wood and from what I researched we hoped it would be more straight than wood might be.  I was a little thrown off by the fact that a 1" x 4"is not actually those dimensions, but slightly less.  You can see in my new drawing below that the 4" wide boards were actually 3.5" which meant I needed some new calculations. (What?!?! How much sense does that make? Obviously I am never the one who buys wood for projects around our house, since I just figured this out.) 

After some changes to my first calculations, I came up with a new drawing and a cut list for my husband so he could get started on this while I was at work. 

We started off using liquid nails to adhere the boards to the wall, but that top piece wasn't laying flat because *surprise, surprise* our wall is very uneven.  So you can see some of the boards have a few screws holding them up. Frog Tape helped keep things in place and evenly spaced as we went.

I spent a good amount of time caulking where the boards joined together and along every edge against the wall.  The unevenness of the wall made this a much longer of a step than I anticipated but I kind enjoyed doing it.  Except that I had a very difficult time getting the board to look seamless where they met each other.  So I did the best I could then started painting with Satin white paint we had from painting trim around the house.

After I got it all painted I wasn't happy with how the seams looked so we took the sander to it to smooth things out better.

A little more painting, adding hooks, art and a basket for shoes (for the time being) and it was finally done!

I love how it makes the area more of a defined space and not just a huge empty wall with a dirty pile of shoes.

Watercolor of Boston makes it feel nice and welcoming.

We picked up these hooks at Home Depot for about $5 a piece.

We are all happy to have a place to hang our things.


Project breakdown:
MDF: ~ $27 (with only about 2 feet of board left over)
Hooks: ~ $15
Caulk: ~ $5
Liquid Nails: ~ $3.50
Paint, screws, sander: already owned

Total: ~$50


Linking up here:

The Pinterest Challenge


Sunday, February 26, 2012

Being Green: Composting

One of the things my husband and I pride ourselves on is being as 'green' as we can be.  We're not perfect by any means, but we try our best and it makes us happy to do it.  So you can look forward to some "Being Green" here on Pandiola Lane.

~ ~ ~ ~ ~ ~

Composting is one of those things my parents did and I never thought I would.  But growing up and paying for your own food, then buying a house and making gardens to grow your own food changes that.  It's one of those things that I forget that not every one does. It just makes so much sense to me.  I understand if you don't have a garden or use for compost, it might not be worth it for you.  It's just so simple to do! And you create nutrient rich material to feed your garden for FREE. (Of course you might pay for the food scraps that go into it, but it would have been trash anyway, so it's FREE!)

First you need a compost bin.  There are quite a few options out there and many counties (including my own) will give you a compost bin for free; worth looking into if you want to be as low cost as possible.  We ended up buying one because I wanted one that could be turned easily.  *Turning the compost is a necessary step in the composting process.  This is ours:

 It's basically a big tumbler that sits on a base with rollers.  It's not very big but it's enough for our use (we have a small yard and only two garden beds we use it in.)

It get's pretty heavy and hard to turn when it's really full, but relatively speaking, it's pretty easy to turn the compost over - no pick forks or shovels needed.  AND when we're ready to use it, we just roll it across the yard to the vegetable gardens (I get maybe a little too excited when that day comes!) No shoveling into a wheel barrow first.  

And another bonus is the base serves two functions.  Can you see a knob down then on the bottom in the middle?  On the underside of the tumbler are a few slits.  As the compost does it's thing, the "juice" seeps out through the slits and through some openings in the base.  The "juice" can then be used to fertilize plants - nutrient rich and NO chemicals! And FREE!
Because running outside to the compost bin everytime you have something to deposit is not practical (at least in my eyes) it's helpful to have a collection pail in the kitchen.  This is ours:


Sits right next to the kitchen sink for easy access.  I think ours is from World Market (gift from my parents - Thanks Mom and Dad!) but it's similar to this one.  Browsing through Amazon you can find some nice decorative ones.  It has a filter in the top and we've never had an issue with it smelling in our kitchen and our filter is over a year old. I'm sure you're supposed to change the filter at some point but we haven't seen a need for that yet.

When it gets full we dump it outside. Usually takes us about a week to fill it up before we have to dump. Sometimes less time.

So what can you compost?  Basically, any plant product and egg shells - our regulars are fruit and vegetable scraps, egg shells, flowers, leaves and grass.  You need a good balance of wet and dry materials going in compost bin.  We just throw all our kitchen scraps in there and when it looks super wet we add dry leaves.  I'm not an expert on all the details so check out How to Compost for more specifics.

Even though that collection pail is mighty convenient, I'd rather not have it open for more than a few seconds to add stuff too it (pretty darn smelly sometimes all the time).  So, I usually grab a bowl or plastic container that's already dirty in the sink when I'm chopping veggies for dinner and toss everything in there.  Guess it's another step but I'd rather not have my counters covered in veggie scraps while I'm trying to make dinner. (And I can't STAND carrot and potato peelings in the sink!)


This is what our bin looks like right now - full to the rim! (and spilling out a little...that's what happens when you run out in bare feet in the winter and dump the pail too fast) 

You can see quite a mixture of fresh stuff on top of the dark stuff.  That dark stuff is already composted material, ready to use!  However, that sucker need some strong arms (not me!) to turn it so the rest can finish composting before we need it in the gardens; which might be soon considering it's still February and already is feeling like spring.  There are daffodils and crocus blooming already!  Anyway....

Honestly, one of my favorite things about compositing is that it makes for a healthy garden without adding chemicals of any kind.  And I love when we get a surprise plant (usually some sort of squash or pumpkin) that grows out of the compost!  

It's really so easy to get started and even more satisfying to roll that puppy out to the garden and start seeing the benefits of all that composting and know you put less waste into a landfill somewhere.

Do you compost? Will you start?

Be Green!!

Related Posts Plugin for WordPress, Blogger...