Showing posts with label sewing. Show all posts

Saturday, March 3, 2012

Nap time Curtains

I've already expressed my love for Young House Love so when Sherry posted this update the other day on adding blackout curtains to their daughter's room to increase nap length, I was on it right away!

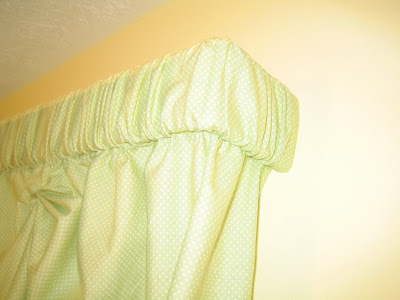
These are the curtains I made (and hung myself) when I was very pregnant. One of those "I've-got-to-do-something-about-that-window-already" moments when hubby wasn't home.


I like them, even though I'm not a huge fan of this type of curtain rod.  What is that called away?


Cute, simple green dots to do with the yellow and green paint job.

Mini blinds, not the best but they served the purpose until this happened:

Our little girl has destroyed the blinds by peaking through the window from her crib.  I hate how trashy it looks but it's been that way for several months.  This is reason number one for wanting new window treatments.

Ok, enough of that.  

The second reason is nap time seems to be getting shorter and shorter and sometimes doesn't happen at all.  Hubby started hanging a table cloth over the window during nap time to make it darker and thus more nap-friendly.  Not my favorite solution.

So I went off to Joann's for the 50% off Home Decorator Fabric sale.  I bought 2 yards of white black-out fabric and 2.5 yards of this Alexander Henry Kleo Pink cotton:


About $19 and 20 minutes and we now have a dark nap-time ready bedroom! Not completely dark, but much better than before.  AND no plastic mini blinds for grabby little toddler hands to break.


Curtain rod with clips = less sewing (no pocket)


I originally just clipped the black-out fabric behind the fabric, but didn't like the way it looked when the curtain was open.  A little more sewing and now it's much better.


I wasn't sure how well the black-out fabric would hang, but it's not too bad.


And adding some more pink into the originally gender neutral nursery is always a plus.


Thank you Sherry from Young House Love for the inspiration to extend nap time!


Wednesday, January 25, 2012

"Hemming" Toddler Pants

My little 21 month old girl is on the short side (takes after her mama) and pants that fit over her cloth diapers are sometimes too long.  I LOVE these leopard/cheetah? pants but they always drag on the floor and rolling up the bottoms doesn't last long.  So I whipped out my elastic thread and "hemmed" them.

This is the stand-there-and-smile-while-I-take-your-picture pose. She's so patient with me!

After removing the pants from the child (important step) I marked 3 inches up from the hem with a pin on all 4 seams.  No real reason for that measurement other than it looked like the right amount.

With elastic thread in the bobbin (go here for tips on using elastic thread) and tan thread on top, I started shirring rows parallel to the seams.  I tried to stitch in the ditch but realized it wasn't really worth it because the fabric was too think

It's hard to see in my iPhone photos but that's 2 rows on either side of the seam.  I just turned the pants around so I could zig zag back and forth without cutting the thread for every tiny room.  Make sure you go forward and back at the beginning of each new row so it doesn't unravel at some point.

Here is looking at the leg after I only did the left side of the pant leg.  I guess if you want it "hemmed" more, sew higher up the leg.


* I just knew I was going to make this mistake and indeed I did.  Sewed right through to the other side of the pants.  Yup.  All the while telling myself to make sure I wrote about how you should be careful not to do this.  And after I took this picture of my mistake, I did it again. Mommy should not sew after teaching ALL day long. Seriously!

Moving on...
I didn't like how the front and back of the pant leg hung down from the sides so I did two rows of shirring on the front and back (in a U shape). Much better!

This is just a comparison shot of the shirred and un-shirred legs.

Hit it with some steam to shirk the elastic thread so it's more gathered.

Here's a blurring shot of the inside.  My elastic thread in navy blue.  See the U shape there on the left side? That's the middle of the front/back of the leg.

Re-dress your child.
Really? I have to stand here again after you made me sit pant-less while you sewed and wouldn't let me step on the pedal? 

That's my girl!


Saturday, June 11, 2011

Drawstring Bags

I thought this was going to be one of the dorkiest projects I’ve made in a while, 
(and if any of my colleagues read my blog, 
I guess this is just proof that I've really 
embraced teaching elementary school.)
but turns out the intended benefactors loved it!

I teach music (specifically Strings – you know violin, viola, cello and bass) 
and I had encountered a problem in my classroom.
  

That’s a pile of tuners and microphone clips.
My students use them daily but that mess was getting to be too much for me to handle.  
I mean, what’s more annoying that having to untangle all those cords 
AND deal with a room full of elementary schoolers holding noise makers?

Well it’s a good thing I can sew and I had 20 spare minutes after school the other day!


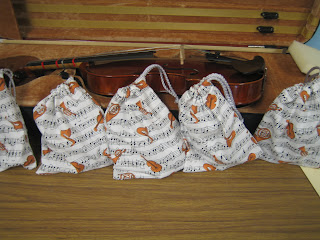
TA-DA!  Tuner bags!!


This is simple enough - but here's what I did.
I simply laid a tuner out
cut out enough fabric in the approximate size
cut out 5 rectangles (for 5 tuners)
sewed with a gusset at the top for the draw string
raid my ribbon/cord stash for 5 cords *more on this below

Done!


* My ribbon/cord stash has everything in it from old bikini ties to shopping bag handles.  I keep anything and everything that might be used for another project.  Case in point!  I think the 4 grey cords came from an Ann Taylor LOFT bag. Perfect length and they slide easily through the fabric.


Nothing fancy but it cleans up that cord mess.


  I inheritated the music fabric from my mom who bought it way back 
when I was in 4th grade and had just started playing viola in school.  Finally got used for something!


My students LOVED them!!! 
Hopefully this will keep things in order from now on.  
Well...at least the tuners will stay organized.


Saturday, April 23, 2011

Easter Dresses

For Izzie's first Easter I couldn't wait to make her a little Easter Dress!

I've made an old t-shirt into a dress for her before (see it here) but never a dress from a pattern.

This is my version of Prudent Baby's Pretty Party Dress.

Those ladies sure do know how to make a.dor.a.ble patterns!

It was so easy to follow and the size is perfect for Izz who is almost a year old.

I'm also glad to say I only had to use 
my seam ripper for two very small sections.
This is progress for me....

I'm sooo excited for her to wear it!  
I LOVE this fabric I found at Hobby Lobby! 
(the dotted one was from the remnant bin - how great is that!?)


Not bad for my first attempt at baby clothes from a pattern, wouldn't you say?


Pretty impressed with my pearlized snaps, if I do say so myself.  
I had no idea it was so easy to add snaps!


Sorry for the mediocre pictures - couldn't find 
the battery charger for the camera so had to use my phone instead.

Ta Da! 


Now for myself, I have this white dress that I bought for my high school graduation, 
(which I'm now realizing was 10 years ago already! AHH!) 
that I like and have worn a few times but was starting to look dingy.


I like the detail of the fabric.  
Sort of an eyelet I guess you'd call it.  
But it needed some updating.


 So after half a bottle of Rit Liquid in Fuchsia . . . 

I have a New Dress!
A bit deeper/brighter fuchia than I was hoping for 
(I'm not really a pink sort of girl) 
but I kind of love it!

(This was my first attempt at dying anything too - kinda fun!)


White cardigan lessens the punch a little 
(and the dress is a little too low cut for church and family dinner.)


Plus I made this pin from a bouquet of silk flowers I had laying around.  
The center color is what inspired me to get fuchsia dye.


All ready for Easter!

Happy Easter!
He is Risen!

Wednesday, April 6, 2011

Changing Pad Liners

We bought these changing pad liners.  Pack of 3 - terry cloth with a plastic-y back liner.


Put them in the wash.  

Then the dryer.  

Then read the cleaning instructions. 

Line Dry 

Great.

So we used them for months before I finally decided to rip the ruined plastic lining off and make them better.

First - take off vinyl edging.


This is the most of something like this that I've thrown out in a long time.  
Definitely not going to use that. EVER.


I cut the terry cloth so it was a little more rectangular.  Cut some fleece (waterproof to catch the "spills") I had picked up from the remnant bin a long time ago (and happened to be the perfect width for this.)


Pinned with right sides facing.  You know the deal.


I used this stitch.  I have no idea what it's really for but it seemed to work pretty well for this project.  Thought I'd mix things up since this is the one of my nine stitches that I hadn't used.


Finished it off by top stitching.


Not fantastic, but it works.  
And the fleece keeps us from having to change the pad cover every other day.


A sub-par product saved by a little creative thinking :)

Ta-da!!

Related Posts Plugin for WordPress, Blogger...