Sunday, April 15, 2012

Fried Rice

I love fried rice! Once I figured out how easy it was to make, it became part of our regular rotation of dinners.  It's a great way to use up leftovers too.  The veggies and meat vary depending on what's in the fridge.

Here's all the ingredients I use:
Eggs
Frozen Pees
Leftover sausage and pork pieces
Leftover chopped celery
Carrot
Half used onion
Rice (could be leftover too)
Sesame Oil
Soy Sauce 
Oyster Sauce


Sometimes I used Hoisin Sauce too.

Ok, here we go:
1.  Start the rice.  It will be done just in time to add to your other pan of veggies and meat. If you have leftover rice on hand, this is really a one-pot meal! Note: I do not add any salt to the water because I'm adding soy sauce later and don't want it to be too salty.

2. Heat sesame oil in your skillet over medium heat. (You can also use canola oil.)

3. Scramble eggs (I used 2 here) and cook in the oil.

4. Remove the eggs from the pan and set aside.

5.  Add more oil if needed and start adding veggies.  Cook the onion in the oil first.

6.  Add more veggies (celery here)

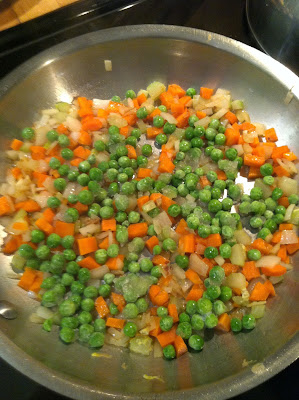
7.  Add carrots, keep cooking...

8. Add frozen peas, keep cooking...

9. Add oyster sauce (or hoisin or both)

10.  Stir and cook till veggies are all tender. (Just turn your head sideways to see this picture the correct way.)

11. Add in any meat, here is my left over sausage and pork.  All my meat was already cooked because it was left over. If your meat is not cooked, you might want to do that before you cook the veggies, then just set aside and add back in here.


12.  Your rice should be just about done by now.

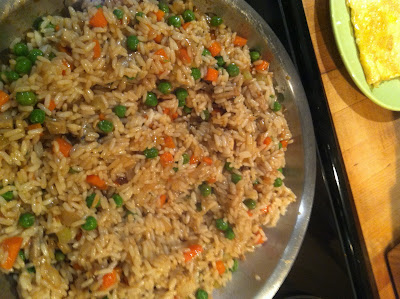
Add it to the pan with the veggies.

13. Add in soy sauce and more oyster or hoisin sauce to your liking.

14.  Chop up the eggs (spatula works just fine).

And add them into the rice.

Mmmm, dinner is ready!

My little girl loves this dinner! 

Of course, she eats all of the peas out of it first.


This dinner usually requires some post dinner rice pick-up.  

Friday, April 13, 2012

Organize Me: Filing System

One of my biggest pet peeves, is the amount of paper we get in the mail and things that constantly need to be filed away for keeping.  Despite 95% of our bills being paperless now, there are still papers that need to be kept.  Having a filing cabinet was just not working for me, and I'm on a mission to do away with it completely.  (It's cheap and falling apart anyway.  It won't be missed.)

First, let's start with the inspiration from Jenna Sue

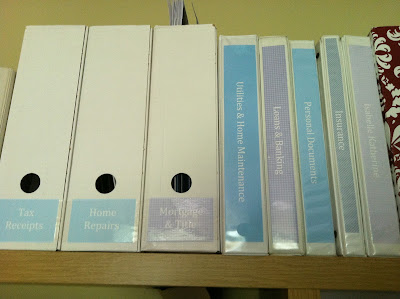
Here's my version. One obvious difference from the picture above is Jenna Sue is obviously better at taking pictures that I am.

But I do like my binder labels.


And I was pretty excited that I was able to find enough white binders and white magazine files around our house, so the cost for this organizing project was $0!!


I played around with the backgrounds a little.


Because I was emptying files, I cut the file folders in half, punched holes and used them as dividers.  All the papers that I deemed necessary to keep got put into plastic sheets.


Keeps all those important documents clean and organized by person.


The Home Maintenance Binder has very little in some of the categories because all of our bills are paperless, but it keeps those service records for our HVAC (and other household things) organized and easy to find.


I still have a ways to go before the filing cabinet is completely empty, but this makes me feel so much better about having to file all that stuff.


Now I just need an organized way to eliminate the pile of stuff "to be filed" that collects on the desk.

Wednesday, April 11, 2012

Organize Me: Linen Closet

I recently spent 45 minutes one morning this week, with coffee in bed (I love being home for Spring Break!), watching HGTV's Clean Freak online.  While I surely will never be quite as obsessively organized as those people are, it inspired me to make my home a little more organized in certain areas.

Our linen closet is a decent size and holds what we need it to.  But, despite my constant reorganizing, things don't always make it to the right spot.  The main idea I took away from those Clean Freaks was labeling everything.  Hello?! That's easy!  And hopefully will help others (like the husband who is GREAT at doing laundry and putting things away) put things back in the correct place.

First I tackled the shelves with all of our spare toiletries.  Things were already in random boxes I collected around the house, but I took a couple minutes and reorganized everything, decided on categories and printed up some labels.  And done! (Please excuse the blurry iPhone pictures.)


Then came the shelves with all the towels, sheets, table cloths, etc.  We have those wire shelves (which I'd love to eventually replace with wider wood shelves) and wanted the labels to be under the piles.  Enter a leftover cereal box and my new scallop rotary blade (Thanks Mom!)

Again, I decided on my categories and printed up some labels.  
Note: it's a good idea to make sure everything is spelled correctly so your husband doesn't have more examples about terrible you are at spelling. Sigh.

I put that scallop cutter to work...

Stuck on the labels...

  Admired my handiwork (with corrected spelling)

Figured out a way to attach the labels to the shelves (cut more labels in half and stick them to the back like below)

Once again admired my handiwork...

And now a nicely organized linen closet!


I love the idea of storing sheet sets inside one of the pillow cases to keep everything thing together (like only Martha Stewart can come up with), and I finally did it.


It's still not my ideal linen closet, which would probably look more like this from Better Homes and Gardens...


But it makes me feel more organized!


I love how simply printing labels can make me so happy!


Related Posts Plugin for WordPress, Blogger...